A Simple Guide to Drawing Roses with Children Yesterday my daughter, who just turned 5, asked me how to draw a rose. I have been drawing, but the difficulty is when I have to teach my child how to draw because it is challenging to express small parts intricate and detailed with children's small hands. Above all, children still lack the training to distribute the screen and draw objects correctly. So, sometimes it's big, sometimes it's small, and they cry because they can't put everything they want on one screen. I find it so cute just looking at it. So I tried to summarize realistic roses with only the features so that young children could draw them. 
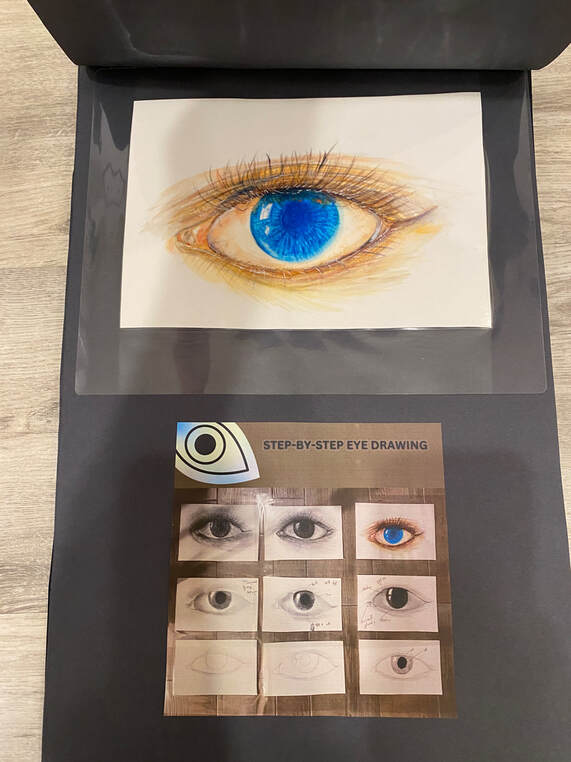
When I draw like this and show it to my child, the child does not become frustrated or annoyed, and she draws hard. Eraser powder can be seen around how hard you erased and drew. So cute. Then I drew a leaf next to it like this, and let her imitate it. She takes a deep breath and draws this too. Eraser powder gradually increases. 
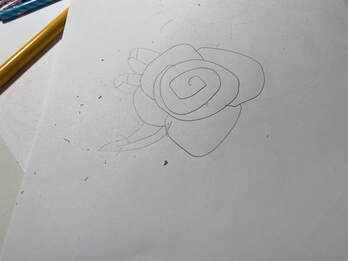
I was going to end it here, but I raised the level and drew a stem. 
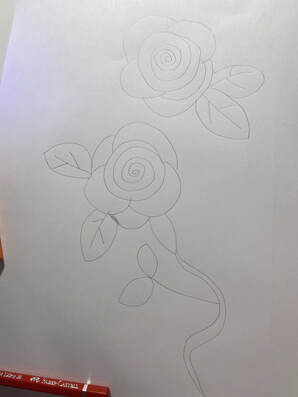
But now that she's gotten used to it, she doesn't get annoyed and draws harder. Perhaps it was because she knew it was time to paint. 
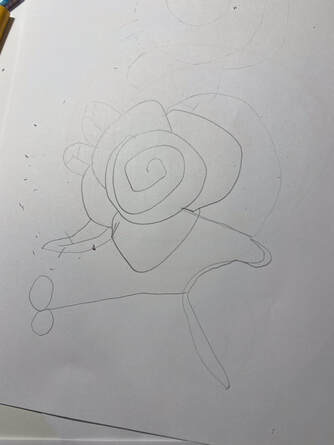
Then, finally, she paints. This seems to be her most enjoyable time for her. 
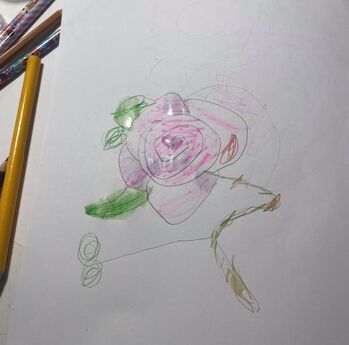
I hope everyone had a wonderful drawing of a pretty rose flower. Teach kids how to draw a rose step by step using simple spirals and curves. A fun, easy art activity that builds creativity, confidence, and fine motor skills for young artists. Roses are often seen as a symbol of beauty and love, but for young children learning to draw, they can also feel a little intimidating. Many parents and teachers wonder how to introduce flowers to children in a way that feels both approachable and enjoyable. The answer is simpler than you might expect: start with a spiral.
By using a spiral as the foundation, children can transform something familiar into something magical. This method not only makes the drawing process fun, but also helps kids build confidence in their creativity. The steps are easy, and the results are delightful—perfect for little hands just beginning their artistic journey. Step 1: Begin with a Spiral Ask your child to draw a gentle spiral in the center of the page. It doesn’t need to be perfect—wobbly lines often add to the charm. The spiral represents the tightly curled petals at the heart of the rose. Step 2: Add Petals Around the Spiral Next, guide them to draw simple curved lines around the spiral, like little “smiles” wrapping around the center. Each new layer of petals can be a bit larger, expanding outward as the rose “blooms.” Step 3: Shape the Flower Encourage kids to overlap some petals and vary their sizes. This teaches them that nature isn’t uniform—each flower is unique, and imperfections make it beautiful. Step 4: Draw the Stem and Leaves Finally, add a stem and a few leaves. For children, the stem can be a straight line or a playful curve. Leaves can be simple ovals with a line down the middle. Step 5: Add Color Invite children to color their rose any way they like. While red or pink are traditional, some may choose blue, yellow, or even rainbow petals. This freedom gives them ownership of their artwork and encourages self-expression. 8/29/2025 12:40:18 am
This is perfect for little artists—simple spiral steps turn into a lovely rose, easy enough for tiny hands. So cheerful! Comments are closed.
|
Myungja Anna KohArtist Categories
All
Archives
November 2025
|
Proudly powered by Weebly
RSS Feed